Getting Started with Git and GitHub: A Beginner's Guide to Version Control and Collaboration

I'm Dhanjeet Kumar Thakur, a dedicated backend developer skilled in Core Java, Spring frameworks, Hibernate, and web tech like HTML, CSS, and JavaScript. With a sharp eye for detail, I create strong backend solutions for seamless user experiences. Git and GitHub are my allies for effective collaboration and code integrity. Always learning, I'm on a mission to elevate my skills and make an impact in Java backend development.
What are Git and GitHub?
Git is a powerful version control system used by developers to track changes in their code over time. Basically, it is used to maintain or store the history of our repository ( Changes done in the repository ). whereas GitHub is a platform where git repositories are stored remotely so you can access it from anywhere.
Is Git is tool or technology? And how are related to each other?
Git is just a tool used for a version control system that tracks the changes done in the repository. GitHub is a website used to store the git repository(repo) remotely. Together git and github use to collaborate with other developers while maintaining the history of our repository. Here repository is nothing but a folder.
How to install Git?
Installing Git is a very straightforward process on most platforms One can simply download Git from the following website: https://git-scm.com/ which is the official website of Git.
Once the git is installed in your local system open the command prompt and check the git version by following the command.
git --version
Here on we will be learning the git commands
Git Commands
git config --global user.name "User Name"
git config --global user.email "User gmail"
The above git command is used for configuring the user details.
To keep the history of the repository first we need to initialize the git and the command...
git init
From here on Git will keep track of changes done in that specific repository where Git is initialized.
git status
The above command is used to check the status of the files. Let's say we created a file inside our repository then that file will be in one of the two stages
Tracked - files that Git knows about and are added to the repository.
Untracked - files that are in your working directory, but not added to the repository.
For git to keep track of files first we need to add to the staging environment.
git add fileName
The above command is used for adding the files in a staging environment. You can add one file at a time or you can add all files present in the repository by following the below git cmd
git add .
#This will add all the files to the stage
There is one more way to add all files of the current directory to the Staging Environment is...
git add --all
#The shortand is

git add -A
Once the files are staged they are ready for commit.
Git Commit: Imagine you're taking a picture of your project at a certain moment. A commit in Git is like that picture. It captures all the changes you've made to your files. You give the picture a short description to remember what you did. Later, you can look at your pictures to see how your project evolved over time. Technically commit is more like a snapshot of a project at a specific point of time. It's a way of saving changes you've made to your code or files and every commit should always include a message. The git command for commit is
git commit -m " message "
git log
The above command shows you a list of all the snapshots you've taken with your commits. It tells you who made each snapshot, when they made it, and the message they wrote to describe what they changed. It's like flipping through pages to see how your project has grown and who contributed to it.
git restore --staged filename
#This cmd is for unstage a file
The above command is used to unstage a file. Let's try to understand this For example let's say you created 5 files in the repository and git is keeping track of changes in these files. After some time you changed your mind and decided to keep only 4 files out of 5 in a staging environment and at the same time you didn't want to lose the 5th file code. So you simply make it unstage and then the commit will not include the 5th file.
git rm -rf filename
#The above command is use to delete a file or folder
#here rm stands for remove, -r stands for recursive and f stands for force
The above Git command will remove the specified file or directory not only from your Git repository but also from your local file system. Be cautious when using this command, especially the -f (force) option, as it can result in data loss if used improperly.
Let's say you are working on a project and the code is working perfectly fine in your local system. Now you want to store your project in GitHub so how can we do that?
How to store your Git repository in GitHub?
First login to your GitHub account from any web browser and create a repository. Then under the code section, you will see a link as shown in the below picture.
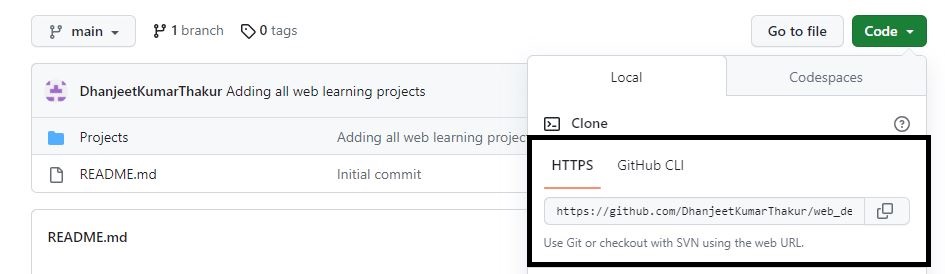
Copy the link go to your local git repository and then run the Git command as...
git remote add origin Your_GitHub_Repository_URL
The above command is used to connect your local Git repository to a remote repository on GitHub. So, when you run git remote add origin Your_GitHub_URL, you're essentially telling Git that you want to add a connection to a remote repository located at the specified URL with the name "origin." This connection allows you to push your local changes to that remote repository on GitHub and fetch updates from it.
git remote -v
The above command is used to view the list of remote repositories associated with your Git project.
As a connection is built between your local and remote repository you can push your local code to the remote repository using the below git command.
git push origin branchName
In another scenario let's say you have code in your remote repository (nothing but in GitHub) and you want that code in your local system. Then you need to follow two steps First add your remote repository link to your local repository as we just learned and second run a git command to clone
git clone Your_GitHub_Repository_URL
Why do we need to create a separate branch?
Let's try to understand this with a scenario. Imagine you're working on a project that already has around 200 files. Suddenly, you need to add a new feature to this project. By default, you'd be working on the master/main branch. Now, let's say you start coding the new feature, but things go wrong. This could potentially ruin the entire project.
What we can do in this situation is create a separate branch, distinct from the main branch. You can then begin coding the new feature in this separate branch. If things go wrong, it won't affect the main branch. If the code is finalized and good to go with the main code, you can simply merge it.
Technically, creating a separate branch is like setting up a separate workspace that won't impact the main branch's code until it's merged.
git branch branchName
The above Git command is used to create a separate branch distinct from the main branch.
Steps to be followed for merging the git branches.
Checkout Target Branch: Make sure you're on the branch you want to update.
git checkout target-branchMerge Source Branch: Merge changes from the source branch into the target branch.
git merge source-branchResolve Conflicts: If there are conflicts, manually fix them, add the changes, and commit.
Commit Merge: Commit the merge with a message.
git commit -m "Merge source-branch into target-branch"Push Changes (if needed): If you're using a remote repository, push the changes to share with others.
git push origin target-branch
What is a pull request and why do we raise a pull request?
Imagine you want to collaborate with other developers on a project. First, you clone the project to your local system and begin working on it in your own separate branch. When your work is complete and you believe it should become part of the project's main branch, you initiate a pull request. This pull request serves as a request for your changes to be reviewed. If necessary, discussions take place, and any required adjustments are made. Once everything is in order and agreed upon, your code is merged into the project's main branch.
Technically a Git pull request is like asking someone to review and accept your code changes. You make changes in your own copy of a project, then send a request to the main project to include your changes. Others review and discuss them before they become a part of the main project. It's a way to work together and maintain quality.